4 Disk Array in a Mac Pro
admin | Sunday, April 5th, 2009 | Comments Off on 4 Disk Array in a Mac ProFor a lot of Mac Pro owners, especially video editors, step number two when a new Mac Pro comes into your possession is to slap in three more drives in the empty drive bays (step one being the unpacking, setting up and fawning over). From that a full-contained 3-disk striped scratch/capture array can be built for just the price of the drives. Maybe you even pop in an eSATA extender to an put extra port(s) on the rear for external drives or a JBOD. All full up. Right?
Not exactly. For those of you with a need, it’s rather easy to create a 4-disk array and keep your boot disk inside, as well. (You could always use an external eSATA boot drive, but where’s the fun in that?) And, you can even keep that [single] external eSATA port. Unless you’ve used up that empty optical bay up top with a blu-ray burner or something, you have some room to grow here.
What you’ll need:
- A drive sled allowing a 3.5″ device (your boot drive, in this case) to mount in a 5.25″ bay (example: MacSales/OWC ). If you’re worried about heat, you can search a little and find a sled that’s also a heat sink.
- A SATA cable that’s at least about 18″ in length (and that eSATA extender bracket, if you’d like to tackle this all at once. This one or this one is long enough, for example).
- A power cable adapter to go from the SATA power port on the drive to the open Molex connector in the optical bay. (Like this, for instance.) If you buy the drive in the retail box (versus OEM), an adapter is included as well as an 18″ SATA cable.
- A long-ish slim Phillips-head screwdriver
- Patience
IMPORTANT: OK, one thing I need to tell you now that you may hear to the contrary — You do not need to remove the riser card bay to do this! Yes, you should probably pull out the riser cards (and definitely pull the power cable!), but that’s it. The riser car bay need not be unscrewed. You need only remove:
- The hard drive trays (and unscrew your boot drive from tray #1)
- The CPU cover (it’s held on by magnets, that’s all)
- The front fan assembly (2 screws and it pulls right out)
- And maybe your video card if it gets in the way of removing the CPU cover
That’s it. Some guides will have you remove too much. Trust me… it’s not as hard as some sites make it out to be. I had all intentions of pulling mine apart and doing a step-by-step photo guide, but then I saw this excellent guide for getting at the guts by Michael Smith. It covers it all quite well. The only difference here is that you will be putting your 3.5″ boot drive, mounted on your 5.25″ sled kit, where he’s putting his optical drive. And, again, perhaps putting in that eSATA bracket on the remaining port while you’re in there.
I’ll wait here while you go do that part… OK. Done? Good. Leave Michael a nice comment, while you’re at it, eh?
Once you’re done moving your boot drive to the optical bay, hooking up the cables, and closing it all back up, you’ll need to put four disks for your array into the 4 empty drive trays. I would not recommend mixing drives of different sizes as it will likely affect your overall storage size and an odd drive may slow down the array as a whole. I highly recommend all the drives be of at least the same size and class, if not the exact same models.
So now you need to create this dang array, right? Well, I won’t punk out and send you elsewhere for the pictorial guide this time. So, fire up the Mac Pro, clear any disk initialization messages and open Disk Utility.
One of the things you’ll have to work out for yourself is block size. In general, larger block sizes are best for things like video where most of the data being read and written is in large chunks. If, however, you plan to use this array for gaming or database storage — in other words, applications which make many, quick calls for small chunks of data — then you’ll want to use a smaller block size. You mileage will vary, but my general, unwarranted suggestions would be: If World of Warcraft or Apache or MySQL will sit on this array, a 32k block size is probably a safe choice. If you’re reading/writing a lot of DV or HDV video, 128k is a fairly safe bet. If you’ll be working on RED or 2k footage, you might want to try 128k or even 256k blocks.
So let’s get to it:
STEP 1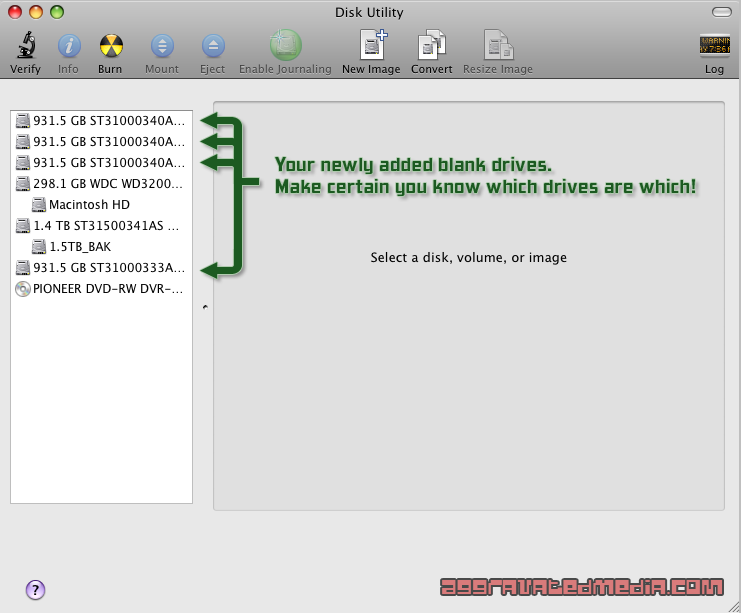
|
STEP 2
|
STEP 3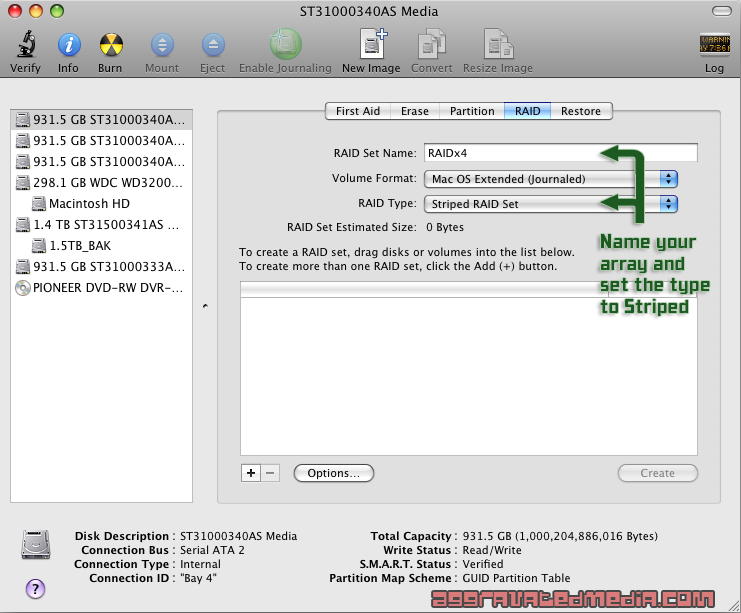
|
STEP 4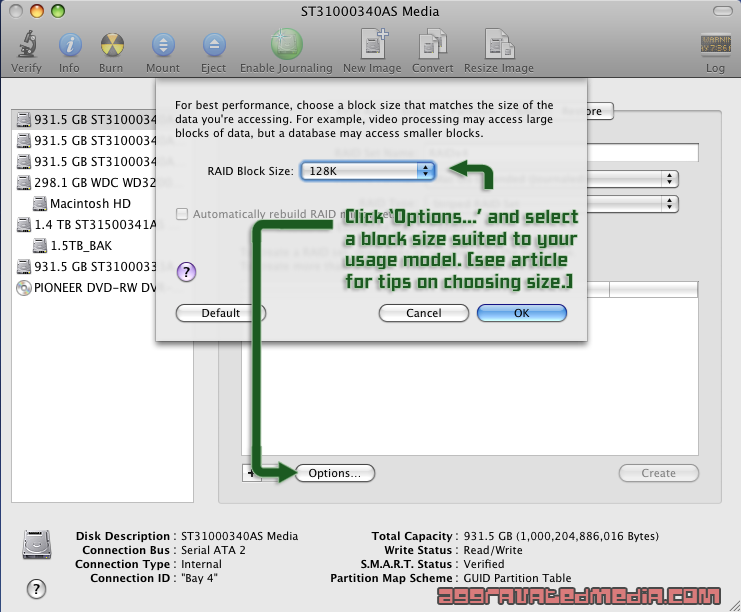
|
STEP 5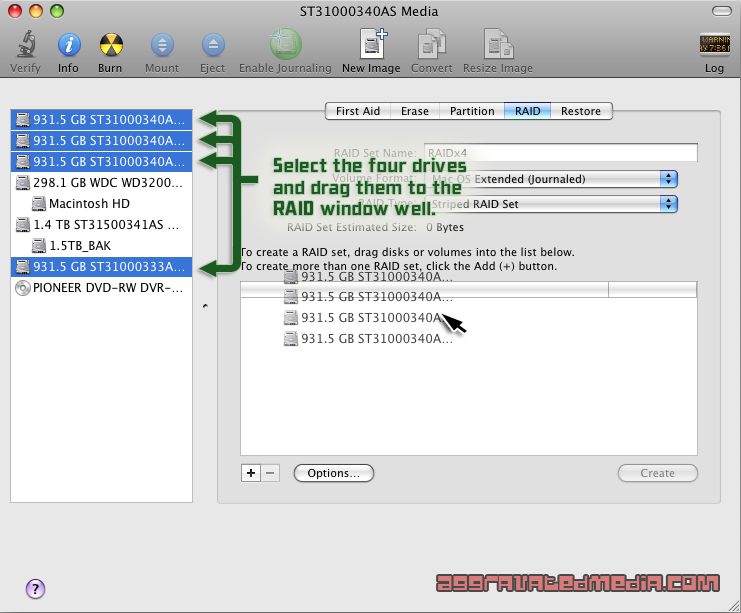
|
STEP 6
|
STEP 7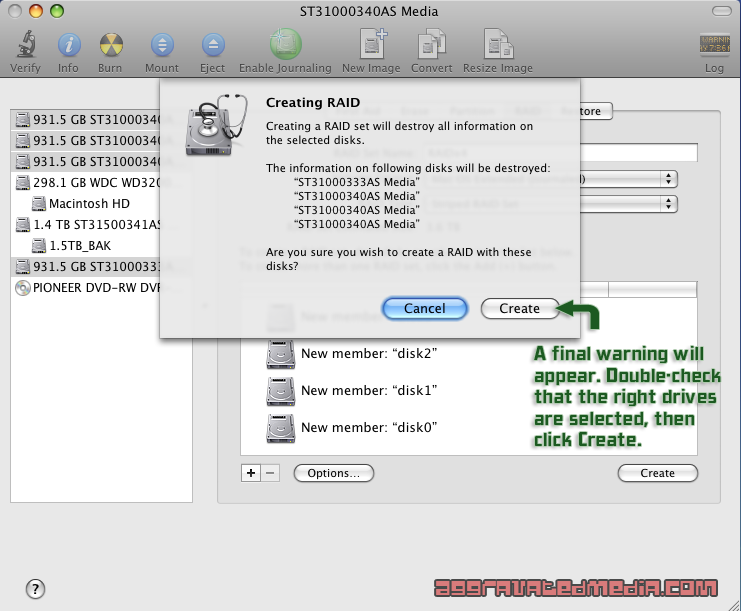
|
STEP 8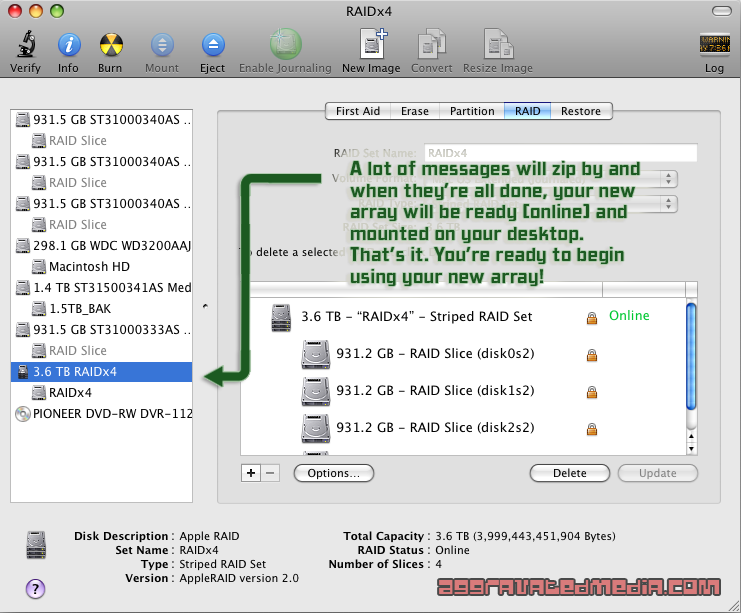
|
And… there you go. You now have a 4-disk striped array inside your Mac Pro. If I’lve left anything out (or too vague), please leave a comment and let me know.
-Maggie